How To Build a Simple OS Using Windows WSL-Debian
 |
| How to build simple os from Windows |
This is just a repost from Osdev wiki here https://wiki.osdev.org/Bare_Bones. It’s very thorough and easy to follow step by step guide developing a simple OS. I don’t have the skill of explaining that well, so if you want to know in-depth, read the original post.
I will only provide a method that is working for me, a summary and the code that is working on my Windows 10. Actually it’s not Windows, it’s Linux inside Windows, it’s 100% Linux, not cygwin or mingw. It tastes like 100% Linux.
Now, here's a step by step to develop an OS on Windows.
1. Have a Linux on your Windows
First thing to do, you are gonna need Windows subsystem for linux (WSL), because the main Windows OS usually doesn’t have very many tools for this kernel development purpose, it’s easier to do in Linux. In case you don’t know what WSL is, you can read my previous article (Windows terminal WSL). I use Debian (but Ubuntu or any Linux that has an apt package manager will be the same, probably).
2. Install GCC on our WSL
This is the GCC in your WSL that will be used for building a custom GCC. Login to your chosen WSL linux, i am using debian, and then install the build tools for the compiler. Usually after fresh install Linux OS on WSL, it's very minimum, i doesn’t have GCC, the C/C++ build tools, so we need to install it. And some text editors like VIM, or just nano, which is already preinstalled. Here’s the build tool that you need to install.
sudo apt install build-essential
3. Build a custom GCC, a cross-compiler GCC
It’s because the default GCC that is available on the Linux package manager will build the binary output customized for the OS, for security and performance reasons i guess. But our Simple OS that we are gonna design is not the same as our main OS, using the default compiler settings to compile binary files is not not gonna run, you need to set GCC to be a cross compiler, kind of like OS independent.
Prepare configurations for building our cross compiler:
export PREFIX="$HOME/opt/cross"
export TARGET=i686-elf
export PATH="$PREFIX/bin:$PATH"
mkdir $HOME/opt/cross/bin
mkdir $HOME/src
sudo apt install git bison flex libgmp3-dev libmpc-dev libmpfr-dev texinfo libisl-dev
Those basically setting up some variables, so that we will be able to locate path location of our build tools. It's also trying to install some necessary tools and libraries for compiling Binutils and GCC.
a. Building Binutil
- Download binutils source code, binutils has the ld command in it for linker i guess, who knows.
cd $HOME/src
git clone --depth 1 https://github.com/bminor/binutils-gdb.git ~/src/binutils-gdb
- Compiling binutils-gdb
mkdir ~/src/binutils-gdb/build-binutils
cd ~/src/binutils-gdb/build-binutils
../configure --target=$TARGET --prefix="$PREFIX" --with-sysroot --disable-nls --disable-werror
make
make install
- Check to see if it’s installed correctly
which -- $TARGET-as || echo $TARGET-as is not in the PATH
b. build gcc
- Download gcc source code
git clone --depth 1 https://github.com/gcc-mirror/gcc.git ~/src/gcc
- Compile gcc
mkdir ~/src/gcc/build-gcc
cd ~/src/gcc/build-gcc
../configure --target=$TARGET --prefix="$PREFIX" --disable-nls --enable-languages=c,c++ --without-headers
make all-gcc
make all-target-libgcc
make install-gcc
make install-target-libgcc
- Check if it’s installed
which -- $TARGET-gcc || echo $TARGET-gcc is not in the PATH
This is such a heavy task to begin with, but it’s worth it. And those compiling binutil and gcc is one time only, you don’t need to repeat the process later. And now if you follow the steps correctly, you will successfully have a bin until and gcc for cross compiling which does not depend on the os, not like a regular gcc. Now we can begin building a simple OS.
4. Our kernel code
- The bootloader? boot.s
Compile the code using:
i686-elf-as boot.s -o boot.o
- The kernel - kernel.c
Compile the code using:
i686-elf-gcc -c kernel.c -o kernel.o -std=gnu99 -ffreestanding -O2 -Wall -Wextra
- The linker.ld
Compile the code using:
i686-elf-gcc -T linker.ld -o myos.bin -ffreestanding -O2 -nostdlib boot.o kernel.o -lgcc
5. Testing on QEMU
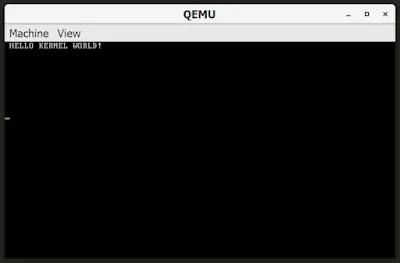
Now after all the process is finished. You can have a build kernel named myos.bin, you can proceed to test our simple “Hello world” OS kernel, using qemu.
You need to quit from WSL because qemu is not working in WSL, so you must install qemu in your main OS. Before quit WSL, first copy your OS myos.bin to the place where you can open that file from your main WIndows OS, you can move it to Desktop folder like this:
cp myos.bin /mnt/c/Users/your_username/Desktop/myos.bin
- Download and Install qemu to your main Windows OS from here https://www.qemu.org/download/
- Add qemu to PATH, so it can be run from anywhere
- Run our kernel binary from Windows terminal or command prompt using qemu.
qemu-system-i386 -kernel c:/Users/your_username/Desktop/myos.bin
 |
| Qemu simple hello world OS |
6. The code
All the code are available on Github there https://github.com/mudiadamz/my_simple_os.
To ship our simple OS in ISO format, maybe we will cover that later, but it turns out it’s not that easy to do in Windows WSL. In the next article we will also be doing some C programming, to put some progress to our kernel, a basic functionality of an OS. This is just an article and is just a beginning, i hope i have time to continue soon.
If you still kind of confuse what is that all about, you can read the full hows and whys from the original article from OSDEV here https://wiki.osdev.org/Bare_Bones. They are doing very good explaining thing.


